
All Panopto recordings can be edited directly in browser using Panopto’s video editor. There’s no need to install any software on your local machine as you can access the video editor via your Canvas modules.
Panopto’s video editor can be used to:
- rename and trim your recordings
- add, edit and delete presentation slides
- add or delete streams
- change your video’s thumbnail image.
The video editor
Panopto’s video editor can be accessed from the Video Library under the Panopto tab, found in every Canvas module’s left navigation panel. Simply, hover over the video you want to edit and select the ‘Edit’ icon. This should then open the video editor in a new browser tab. To get started, it might be worth familiarising yourself with some key Panopto terminology:
Top Toolbar
From here you can rename your recording’s name and locate under which folder your recording is sitting. You can also apply or revert any edits you make to your recording, by selecting the ‘Apply’, and ‘Revert’ buttons respectively. Additionally, you may choose to edit the recording’s settings, share it, or access its viewing statistics.

Streams
Once you open the video editor, you should see that below the video there’s an area with a timeline (or multiple timelines) showing the video frames and a spectrogram. These are the video streams. There are usually two streams per recording, primary and secondary, with labels P1 and S1.
| Primary stream (P1) | Secondary stream (S1) |
|---|---|
| primary video/audio stream, e.g., the video of the presenter | examples: presentation slides, a shared screen, an additional camera, embedded content, such as YouTube videos, etc. |
Steams (2025) courtesy of University of Stirling
Video controls
Video controls refer to the panel on the left side of the editor window that includes the following tabs: Details, Contents, Captions, Audio Descriptions, Slides, Quizzes, Cuts, Streams.
From the video controls area, you can do the following:
Edit closed captions (Captions tab)
To learn more, please read How to edit or delete captions (Panopto, 2023).
Add or edit Smart Chapters to your recording (Contents tab)
To learn more, please read How to use Smart Chapters (Panopto, 2023).
Import your presentation slides (Slides tab)
To learn more, please read How to Add, Edit, and Delete Slides in the Editor (Panopto, 2023).
Edit where a slide appears on the video’s timeline (Slides tab)
To learn more, please read How to Add, Edit, and Delete Slides in the Editor (Panopto, 2023).
Add or delete streams (Stream tab)
If you want to learn more, please read How to Edit and Add Streams in the Editor (Panopto, 2024).
To learn more about Panopto’s video editor, please read Learn About the Video Editor (Panopto, 2025).
Using the cut tool to edit your recording
Panopto’s video editor allows you to cut a section from your recording should you need to edit out a part or multiple parts of your recording.
There are two ways to go about this with one being more accurate than the other.
Method 1
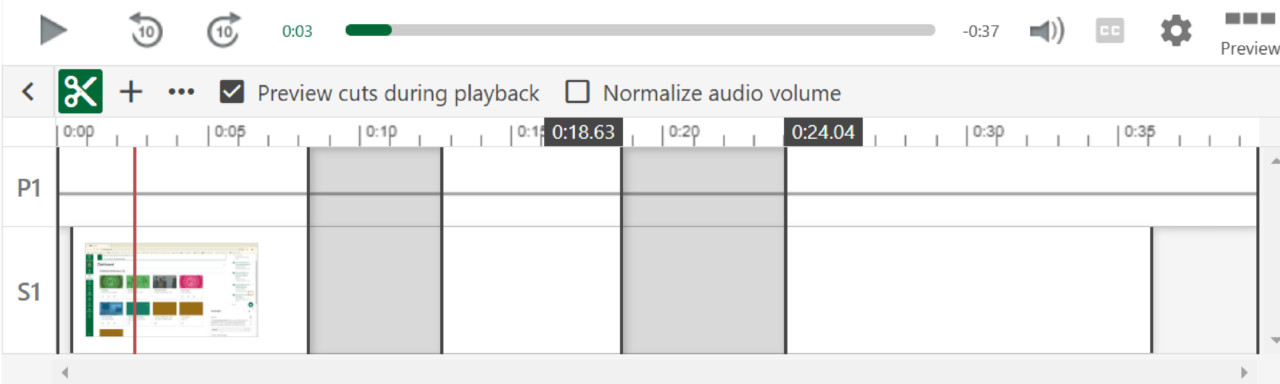
Use the cut tool (pair of scissors icon) from the editing toolbar sitting above the timeline.
Determine start and end points
To ‘cut’ a video, you should first determine a start point and an end point for the segment of the video you would like to remove. Once you decide where to place your start and end point markers on the video’s timeline, select the cut tool, i.e., scissors icon, then hover over the timeline until you see the time where you want your edit to begin.
Once you see the right time, click down and hold down the left-mouse button and drag the cursor to the point where you want the edit to finish. Keep holding the mouse down until you see the time at which you want that segment to end and then release the mouse button.
The area you select will be greyed out and won’t be played back to viewers.
Use the magnifying glass icon for more accuracy
It can be quite ‘fiddly’ if you are trying to find an exact time on the timeline. You can expand the video timeline to make it easier to find exact times. Do this by using the magnifier to the top right of the timeline. You can then scroll, using the scroll bar under the timeline, to move from left to right.
If you make a mistake at any stage, select the ‘Revert’ button from the top of the screen to remove all edits. When you finish, select ‘Publish’ to save your edits. Note that the trimmed parts will remain as greyed out areas in the timeline when editing the recording, but will not appear to viewers.
Method 2
If you wanted to remove clips from your recordings with more accuracy, you could do so by directly editing the timestamps of the clips you would like to cut.
Once you’ve followed the steps under Method 1 and you’ve greyed out the target segments in the video timeline, you should then navigate to the ‘Video Controls’ panel on the left of you screen. When you select the ‘Cuts’ tab from the navigation menu on the left, you will then be able to see list of timeframes. These are the greyed out areas you specified earlier. To refine your edits, simply select the three dots next to each cut. Finally, edit the start and end times based on minutes and seconds.
To find more detailed guidance, please read How to Trim a Video in the Editor (Panopto, 2023).
Adding an intro or outro to your recording
A simple way to enhance your recording and make it more consistent with the University’s branding is to add an end frame as an intro and/or outro to your Panopto recording.
The University offers a series of video assets and end frames readily available to download from the main University website. You can find available end frames by navigating to Videography and then scroll down to the bottom of the page. You can then download the ones you wish to use as .mov or .gif files to your local machine.
To add an end frame to an existing recording, you should follow the steps outlined below:
- Download the end frame of your choice from Videography as a .mov file to your local machine.
- Upload the .mov file to your Panopto folder.
- Find the recording you would like to add the end frame to and enter the Panopto editor.
- Drag the red line that sits on the video timeline so that it sits right at the end of the timeline where you would like to add your end frame (outro).
- Select the ‘plus’ icon found next to the ‘scissors’ icon to add content, then click on ‘Add a clip’.
- From your Panopto video library, select the end frame clip that wish to add to your recording, then select ‘Insert’.
- Once you are happy with your edits, select the ‘Apply’ button from the top right to save your changes.